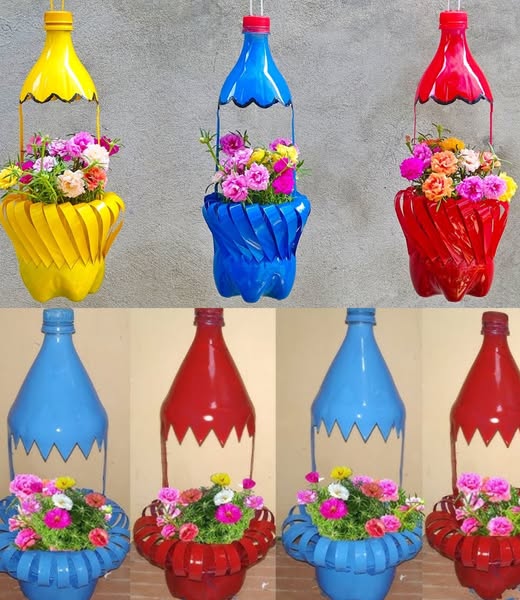
In the spirit of eco-conscious crafting, repurposing everyday items into functional and aesthetically pleasing flower pots is a rewarding endeavor. This guide will walk you through the creative process of making flower pots using plastic bottles and tissue paper—a sustainable and budget-friendly approach that transforms discarded materials into charming containers for your favorite blooms.
Materials Needed:
- Plastic Bottles:
- Collect clean and empty plastic bottles of various sizes to create flower pots with different dimensions.
- Tissue Paper:
- Choose vibrant and colorful tissue paper to add a decorative touch to your flower pots.
- Mod Podge or Glue:
- Use Mod Podge or any strong glue to adhere the tissue paper to the plastic bottles securely.
- Paintbrush:
- A paintbrush is essential for applying the glue or Mod Podge evenly on the surface of the plastic bottles.
- Scissors:
- Sharp scissors are necessary for cutting both the plastic bottles and tissue paper into the desired shapes.
- Decorative Elements (Optional):
- Consider adding embellishments like ribbons, buttons, or twine to enhance the visual appeal of your flower pots.
Step-by-Step Guide:
1. Cut the Plastic Bottles:
- Using scissors, carefully cut the plastic bottles to your desired height, creating the base for your flower pots. Consider varying the heights for an eclectic display.
2. Apply Tissue Paper:
- Cut the tissue paper into small squares or strips.
- Apply a layer of glue or Mod Podge onto the surface of the plastic bottle.
- Carefully adhere the tissue paper, ensuring smooth coverage. Repeat until the entire surface is covered.
3. Layer and Texture:
- Experiment with layering tissue paper in different colors to create unique patterns and textures. Overlapping colors can result in a beautiful and dynamic finish.
4. Allow to Dry:
- Let the flower pots dry completely. This ensures that the tissue paper adheres securely to the plastic surface.
5. Trim Excess Tissue Paper:
- Once the flower pots are dry, trim any excess tissue paper from the top and bottom edges for a clean and polished look.
6. Add Decorative Elements (Optional):
- Get creative by adding decorative elements such as ribbons, buttons, or twine to further personalize your flower pots.
7. Plant Your Blooms:
- Once your flower pots are decorated and dry, fill them with potting soil and plant your favorite flowers or herbs.
- Ensure proper drainage by creating small holes at the bottom of the plastic bottles.
8. Display and Enjoy:
- Arrange your newly crafted flower pots on windowsills, shelves, or as part of a centerpiece.
- Admire the beauty of your sustainable creations and the blooms they nurture.
Benefits of Plastic Bottle and Tissue Paper Flower Pots:
- Sustainability:
- Repurposing plastic bottles and tissue paper reduces waste and contributes to a more sustainable lifestyle.
- Cost-Effective:
- Crafting flower pots from readily available materials is a cost-effective alternative to purchasing traditional planters.
- Customization:
- The creative process allows for endless customization. Experiment with colors, patterns, and decorative elements to match your personal style.
Creating flower pots from plastic bottles and tissue paper is a wonderful way to infuse sustainability into your gardening and crafting endeavors. By breathing new life into discarded items, you not only reduce environmental impact but also showcase the beauty that can emerge from simple, repurposed materials.
Embrace this eco-friendly project, and let your blooming creations add a touch of charm to your living spaces while championing a greener lifestyle.